Category Archives: Lisa’s Scribbles

It’s the things that inspire creativity in me like reworking furniture, remodeling a house, baking/cooking, and gardening.

Inspiration – Day Photo Shoot

Sometimes inspiration can come from anywhere, this time it came from photographing my good friend’s family. Put together fall leaves, a park, and little munchkins running around and you’ve got yourself a photoshoot! It wasn’t the easiest to capture the moments with five little ones running around, but I managed to get a few. Kinda makes me want to go out and snap some pics of my own family now…

And FYI, I’m not a professional photographer, I just like to dabble in it with family and friends. In case you were wondering.

[supsystic-gallery id=2 position=center]

From Drab to Fab – Cabinet Door Repurposing

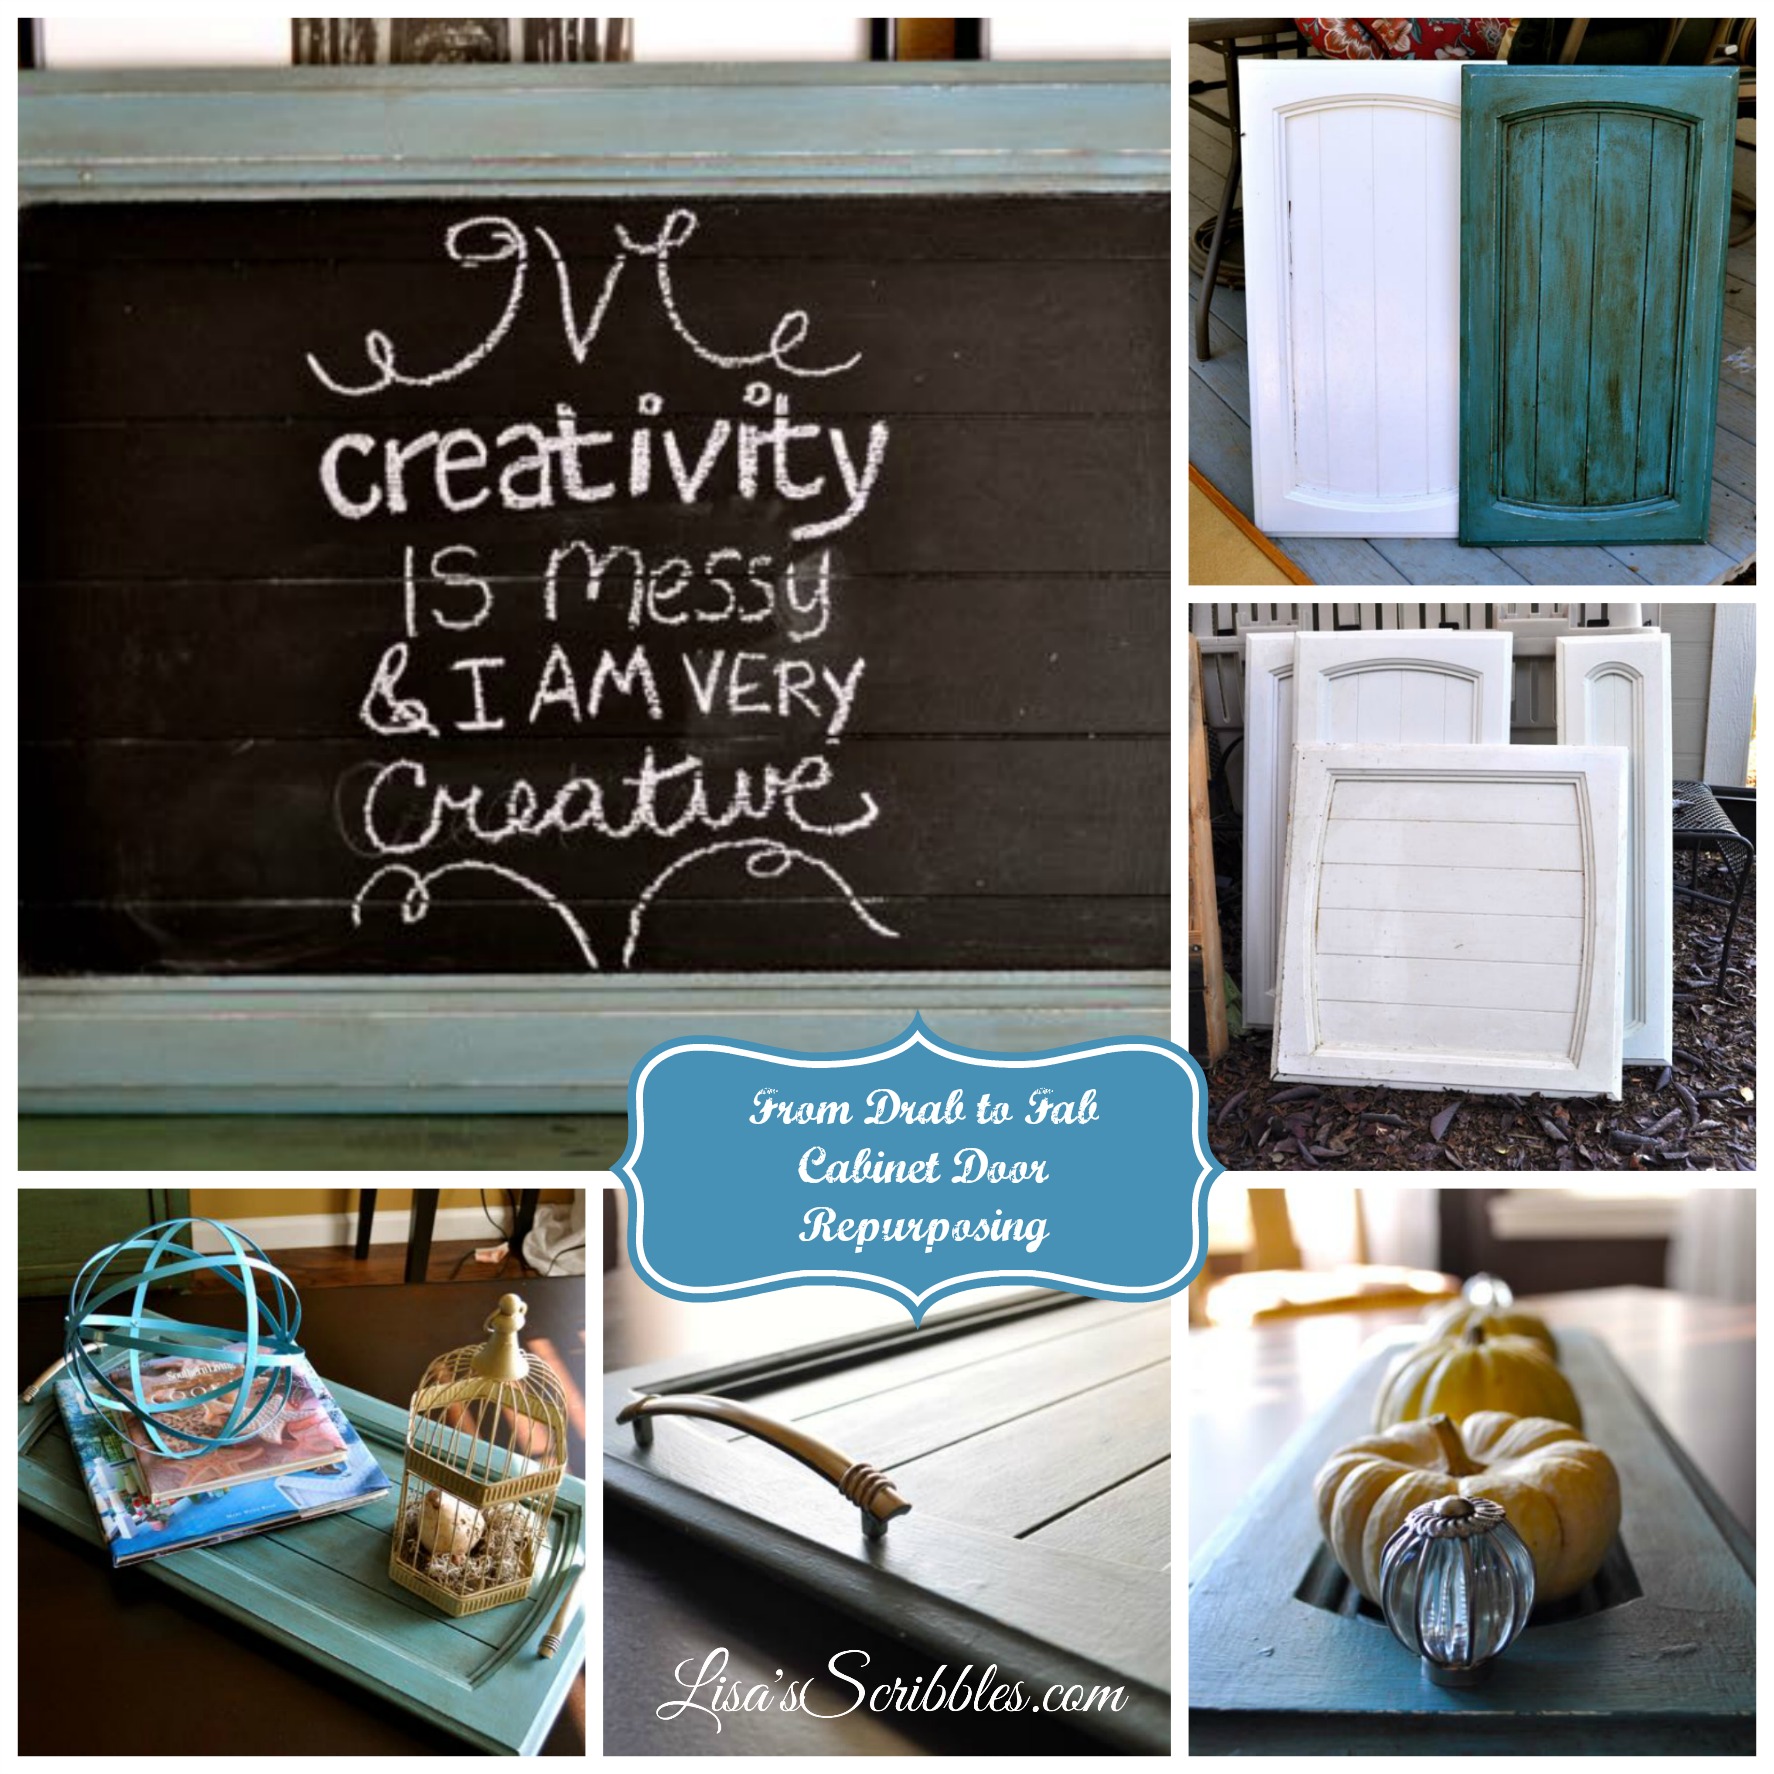
Talk about your WOW factor, these old cabinet doors from last years Wanna Be Remodel have taken a drastic turn from drab and worn out to super fabulous! 

Cabinet-after-collage

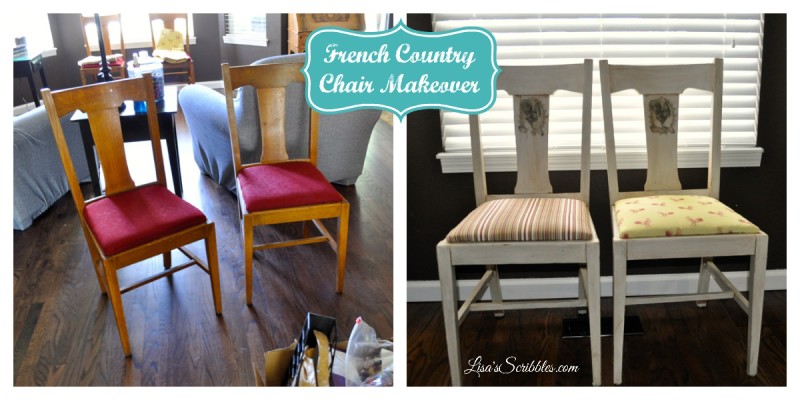
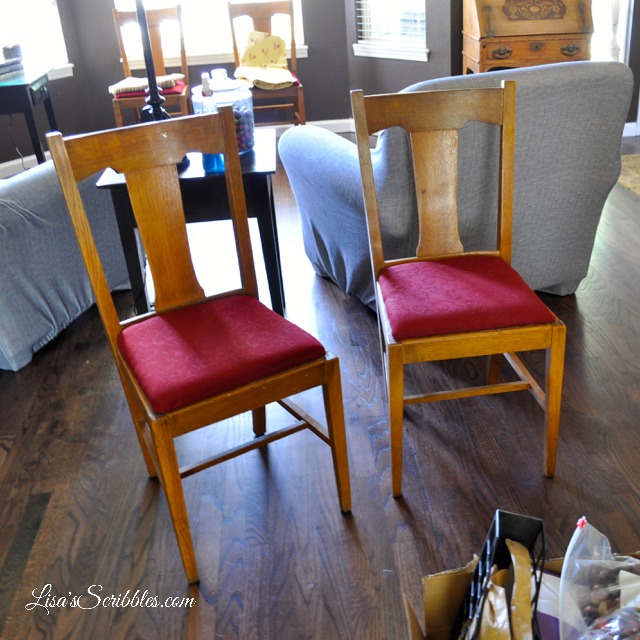
If you’ve been following me for a while you know that I did five major remodels from October 2013 to May 2015, along with me releasing 5 novels. We had my parents home in which we ripped out their old oak flooring and salvaged for our own home, you can see the post here.  Then there was the Kingswood House Remodel, a former rental property that was time to sell. That was a top to bottom overhaul. After that 12 week project came the Wanna Be Remodel…and talk about a mess! It was a rental gone really wrong…I chalk it up to a lossy property management company. Oh and we weren’t done yet because we then had the Fry Rental remodel, yet again another case of terrible property management. And then the last but not least, our own house remodel. Whew…I’m tired just writing this! 

So I say all that to tell you  sometimes you find a gem in all the dirt and muck, a gem that your lovely hubby rolls his eyes at and then says you figure out where to store it. Well my lovely gems came from the Wanna Be Remodel, from the kitchen cabinets to be exact! The old doors had a country charm to them that I just could resist, and I saw a new life for them to showcase the details that had too many layers of paint. They were likely original to the house, or at least 30+ years old. They had so much grime and grease on them that it took a while to get them clean. But the end result is oh so worth it!

Cabinet-collage-before

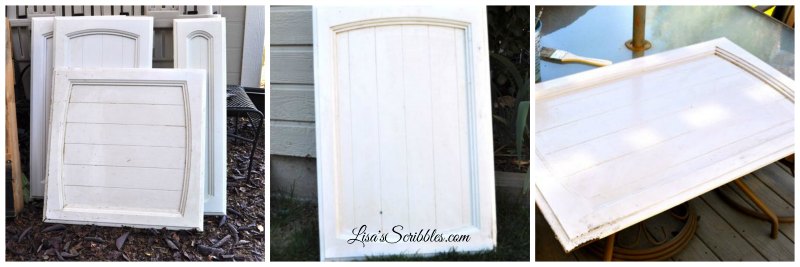
To start off with, the only prepping I did was to clean off the grim, dirt and dust from the cabinet doors, after that I went at it with some chalk paint. I choose to use what I already had on hand and pre-made from a previous project. I’d had it stored in the garage in  the cupboard with only some plastic wrap covering the plastic container…four months ago! Yup, the chalk paint was still good! I just added a little water to loosen things up a little and went at it. The chalk paint recipe is from my good friend Judy at Vintage Street Designs. You’ll need a jar or container to mix it with, preferable one that a lid can be put on. Start with 1/4 cup plaster of paris (you can find this at any home improvement store in their paint area), 1/4 cup of warm water and 1 cup of flat paint the color of your choice. It’s that simple and that cheap!

cabinets-paint-during

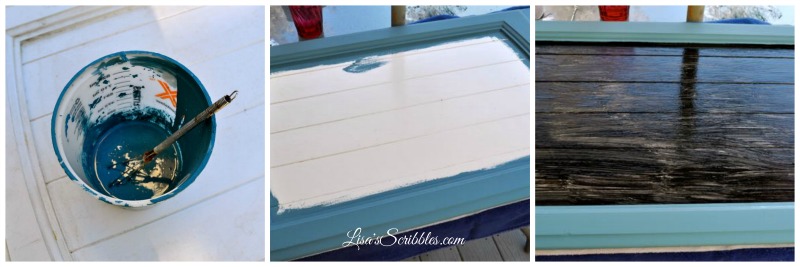
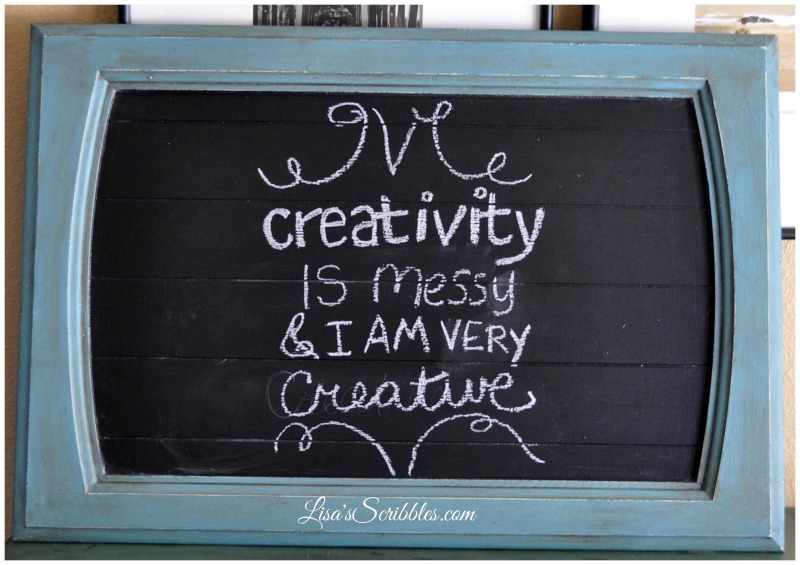
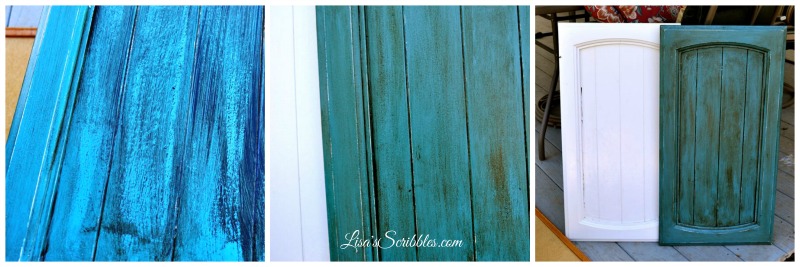
On the larger door I chose to only paint on the outer edges and used chalkboard paint for the center. Just a note, you’ll want to buy the chalkboard paint, it’s not the same as chalk paint. You’ll also need to paint a few coats to make sure it’s all covered. I then decided that I wanted the white paint underneath to show through a little bit, so I took some fine grit sandpaper and worked it over. Once done I pulled out my can of wax and went at it. My first intent was to leave them the Valspar color Flood Tide, but it just seemed a little lifeless to me so I then ended up using my antiquing wax to give it that aged finish that I’ve come to love. 

cabinet-waxing

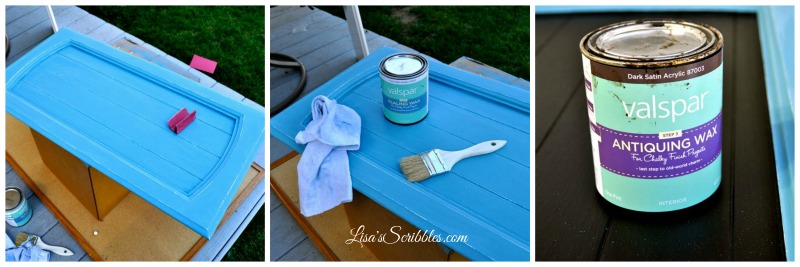
Waxing is a pretty simple process. I have a special waxing brush that I use for large projects, but since this was small and I was being lazy and didn’t want to wash out my brush, I chose to use a throw-away brush, a chippy brush. If you remember the old Karate Kid movies, you’ll understand when I say, Wax on, Wax off. Okay, that probably really dates me, but it is what it is… I highly suggest you work in small areas when waxing, apply a little then rub it off to get the effect you desire. If the wax gets a little too dark, just rub it off, it’s really that simple. Just a side note, it takes a full 36 hours for the wax to fully cure, you can handle it before, but I’d suggest watching what you put on it until that time is up.

cabinets-waxing-after

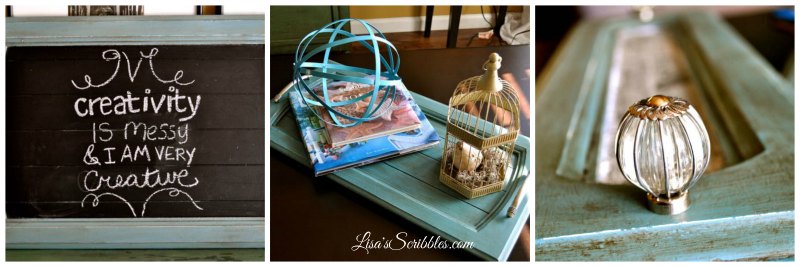
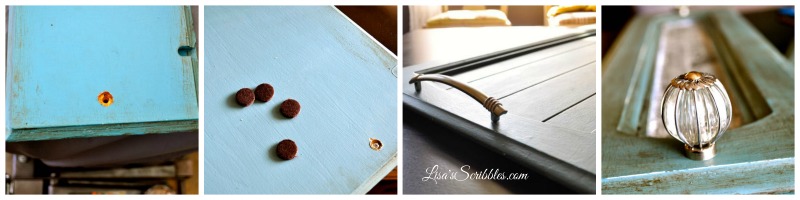
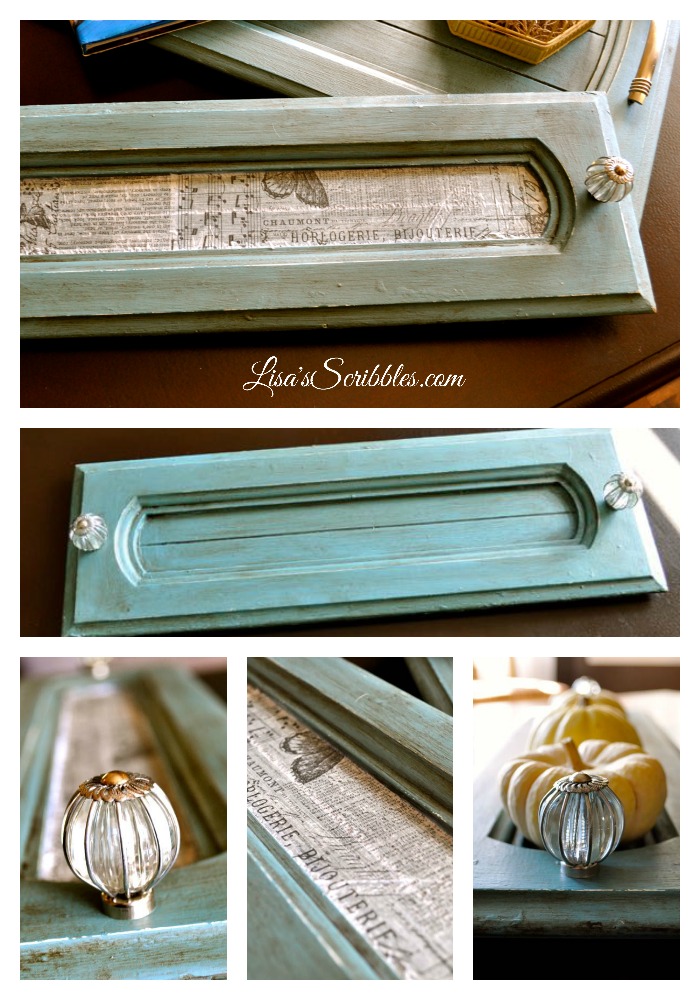
Once I finished with the waxing process, I decided they weren’t quite done yet. One of the cabinets was made into a chalk board that I plan on hanging in my kitchen, the other two were going to be trays. I tend to keep scrap pieces of materials around, and pulled out some old cabinet pulls that had been removed from a previous project. They were the right size for the larger cabinets, but the smaller one needed something size appropriate. I had the perfect glass knobs to use for the them too, however, the screws to attached them were a bit on the long side. Easy fix, I just cut them off!

tray-knob-cutoff

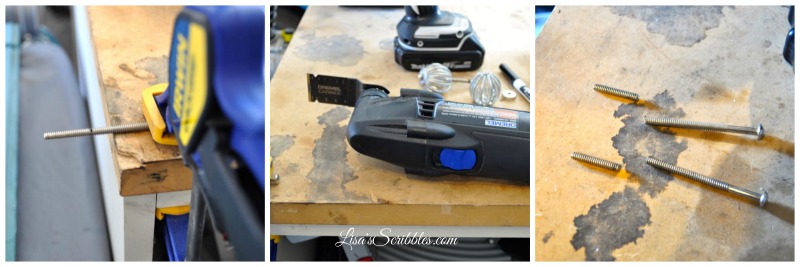
Once done, I drilled some holes on the cabinets and attached the handles/knobs. I choose to use a countersink bit on the backside of the cabinets so I’d have a nice flush surface. I also added felt tabs on the backsides so it wouldn’t scratch my furniture when they sat on display. 

cabinet-knobs-after

They turned out pretty fabulous, wouldn’t you say? 

large-tray-after

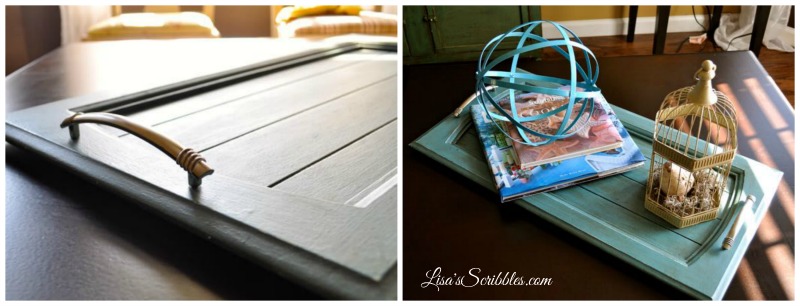
After finding some tissue paper on Amazon that I adored, I added it to the small tray to give that little extra something. A little tissue paper, a little modge podge… Worked, didn’t it? 

small-tray-collage

And let’s not forget that final piece. The beautiful chalk board that’s going to be hanging in my kitchen soon. Gonna have to work on my chalk writing skills though…

chalk-board


French Country Chair Makeover

French Country Chair makeover collage

I’d had these chairs forever, okay, forever in my book is like 15 years and I’d done little with them because they didn’t inspire me till now. They were supposed to be a temporary solution to us not having any chairs for the dining room table, a temporary fix that lasted 15 years. Do I have chairs for my formal dining room table after 15 years? Uh, no…but that’s a story for another time.

After the big push for the remodel this past January because the youngest was graduating from High School, I added some other things to the list as well. You can’t  remodel and not change everything else with it too–that’d be a sin! Okay, not really, but in my decorator’s handbook, on page 2589, section 23b, it clearly states that if I’m updating a room I must update other items too. Other items ie: chairs, table, cabinets, decor…you get the picture.

It also helped that I was in the remodeling mode and wanted to change them, and since I was kinda going with a French Country theme, I went for it.

FC chair makeover1 with watermakr

This is a close up of what they looked like before, nothing too exciting, kinda plain jane. Years ago I changed out the fabric on the seats, but it was never my favorite, I was just using up leftover materials from a previous project.

French Country chair makeover2 watermark

It really wasn’t different this time in me using up fabric I already had on hand. The material was originally purchased to be used on a roman shade for the kitchen, but I never got around to it and then changed my mind…funny how that happens.

French Country chair makeover3 watermark

The next step was to paint the chairs. I used chalk paint that I made myself. It was pretty easy as I got the recipe from my good friend, Judy, at Vintage Street Designs. It calls for 1/4 c plaster of paris, 1/4 c warm water, and 1 c flat paint. We both prefer Valspar or Behr, but whatever you have lying around will usually work. For this project, I actually used a satin finish paint because that’s what I had. So after painting the chairs, I added the design from Graphics Fairy, she has a large assortment of graphics that can be used for just about any project. Special note, if you’re printing it to go onto a project like say a chair, cabinet, and the sort, then you want to use the “reverse print” file so it will come out properly on the piece.

French Country chair makeover9

I applied the graphic using modge podge on the print side and then let it dry. I then used a damp towel to rub off the paper. It’s a timely task to remove the paper, and one should take care that you don’t rub too hard or you’ll remove the image along with paint, like I did. It was an easy enough fix, though, as I just touched up the paint in the small areas.

French Country chair makeover3 watermark

I then applied antiquing wax because I wanted to give it more of a vintage French Country look. You can see the chair on the right doesn’t have the antiquing wax on it and the one on the left does.


FC chair Collage3

I then attached the fabric using my hand dandy pneumatic stapler, and put them out for display. Pretty cute right?

Fall is here!

It’s that lovely time of year when I begin to think about golden and crimson leaves falling, cooler nights, hot apple cider and fires while snuggled under warm blankets. I begin to crave chili and chicken tortilla soup, pumpkin cookies, and pumpkin bread, and pumpkin spice lattes heated to perfection. I begin freezing tomatoes for those future soups and canning applesauce and peaches for those cold winter months. I make my famous jams of strawberries, huckleberries, blueberries and peaches, and I watch my boys polish off jar after jar.

I think about golden and crimson leaves falling, cooler nights, hot apple cider and fires while snuggled under warm blankets.

I get excited about eating yummy warm homemade bread, and homemade bread bowls for that Broccoli Cheese Soup and Clam Chowder. I plan out my fall porch decor and wonder what I’ll do different this year…

Yes, fall is here and I couldn’t be happier. What about you?


It’s looking good!


So I made a change, you know, cuz I can. I’ve reworked my web sites yet again and this time I’ve broken off Lisa’s Scribbles for good. Yeah, I went back and forth for a while, thought it’d be good to have everything on one site, but quickly realized it’d be too confusing for newcomers to both my author site and my scribbles site.

Don’t worry, I didn’t get rid of either, they’re still linked, it’s just that I’ve made the Scribbles side more personalized for my second passion, DIY’ing. Take a look around, I think you’ll like the new clean-lined site. It’s pretty easy to navigate and find what you’re looking for.

And now back to work for me…someone’s gotta write those books and create stuff to post!